How to Configure IPsec Tunnel with Palo Alto and Zscaler ZIA [Experience Center].
Section 1: Configuration at ZIA End
A. Configure VPN Credentials
Navigation: Infrastructure > Location Resources > VPN Credentials
Click on “Add VPN Credentials”
Authentication Type: FQDN
Set the User ID (refer to screenshot below)
Select the Cloud Domain (refer to screenshot below)
Set the Pre-Shared Key: Example@224
Click Save.
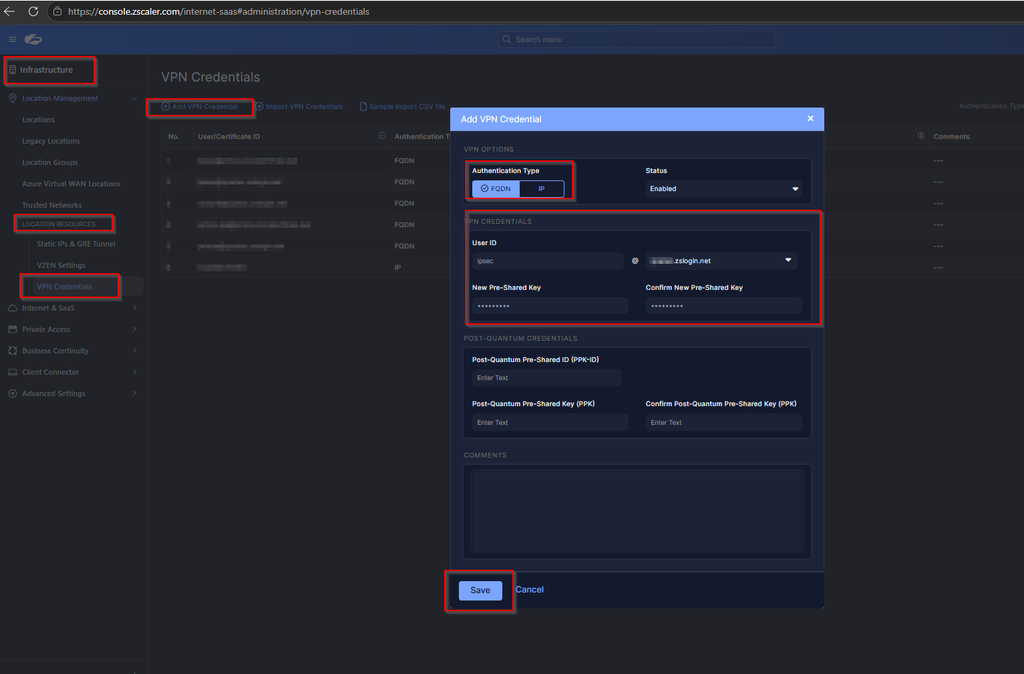
Figure 1 – ZIA: Add VPN Credential dialog (FQDN authentication selected)
B. Configure Locations
Navigation: Infrastructure > Location Management > Legacy Locations
Click on “Add Location”
Enter a descriptive Name for the location
Choose the Country
Select the City
Set the Timezone
Set Location Type to “Corporate User Traffic”
Select the VPN Credentials created in step A
Leave all remaining settings at their default values
Click Save.
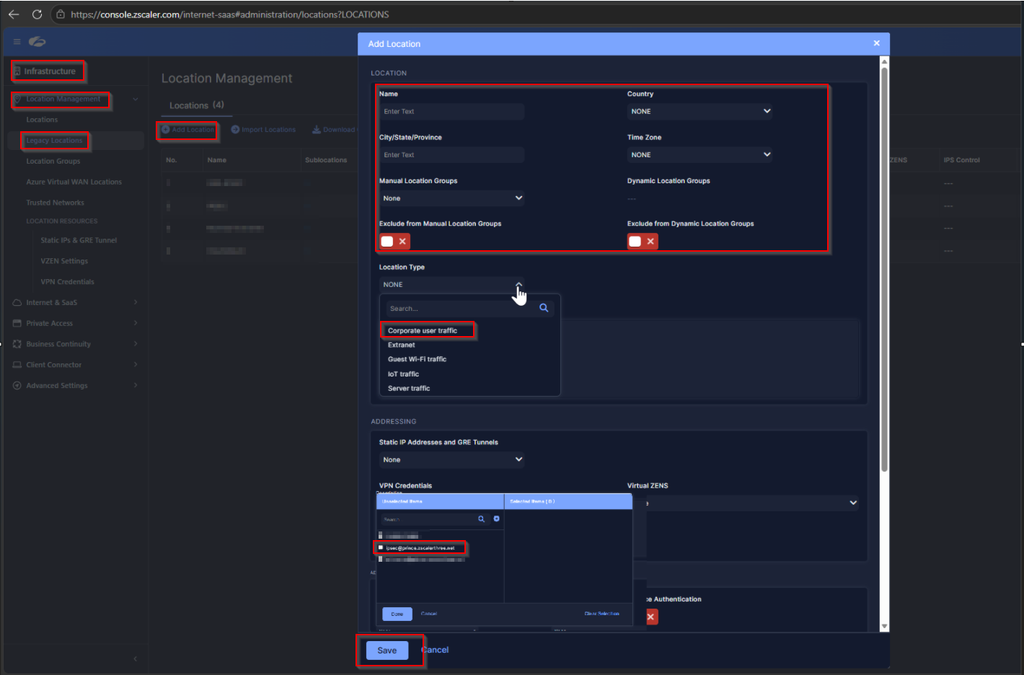
Figure 2 – ZIA: Add Location dialog with VPN Credentials assigned
C. Activate the Changes
After saving the location, activate all pending changes to push the configuration live.
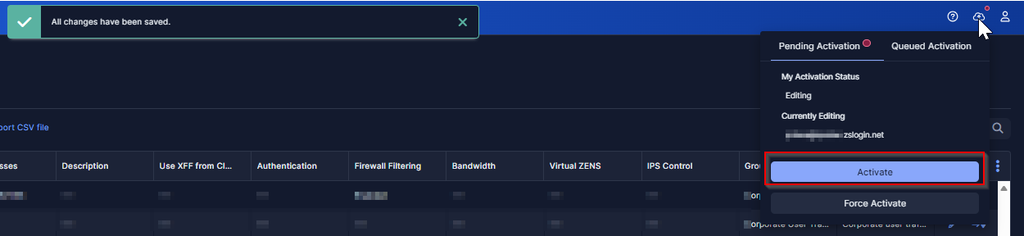
Figure 3 – ZIA: Activate button highlighted in the top-right toolbar
✅ ZIA-side configuration is now complete.
Section 2: Palo Alto Configuration
A. Create IKE Crypto and IPsec Crypto Profiles
In this scenario, the default IKE Crypto and IPsec Crypto profiles are used. No custom profiles need to be created unless your security policy requires specific algorithms.
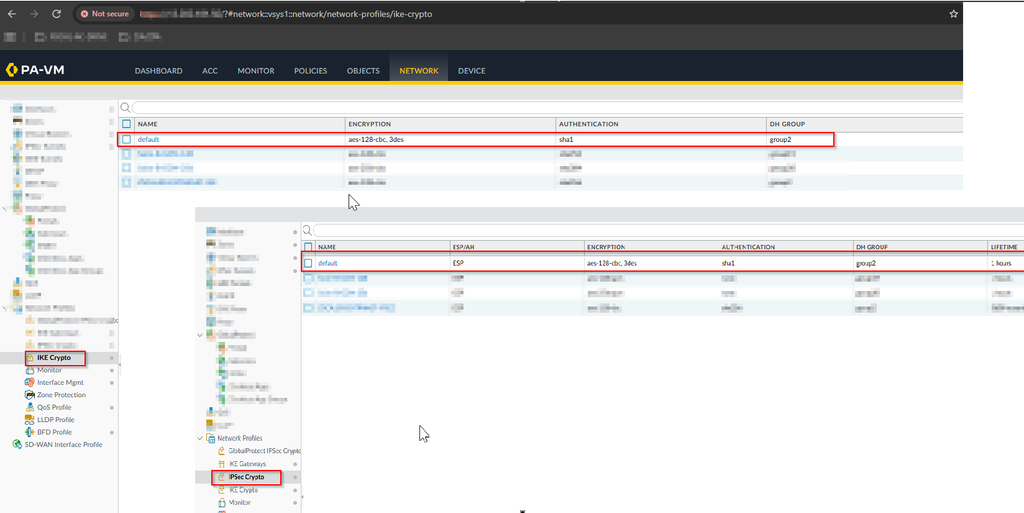
Figure 4 – Palo Alto: Default IKE Crypto (top) and IPsec Crypto (bottom) profiles selected
B. Obtain the Peer IP Address
Visit the Zscaler configuration portal:
https://config.zscaler.com/<your-cloud>/center
Select your Zscaler cloud and navigate to Cloud Enforcement Node Ranges.
Identify the VPN Host Name of the nearest node.
Resolve the VPN hostname from the Palo Alto firewall CLI using ping or nslookup:
ping <VPN-hostname>
Record the resolved IP address — this will be used as the Peer IP in the IKE Gateway.
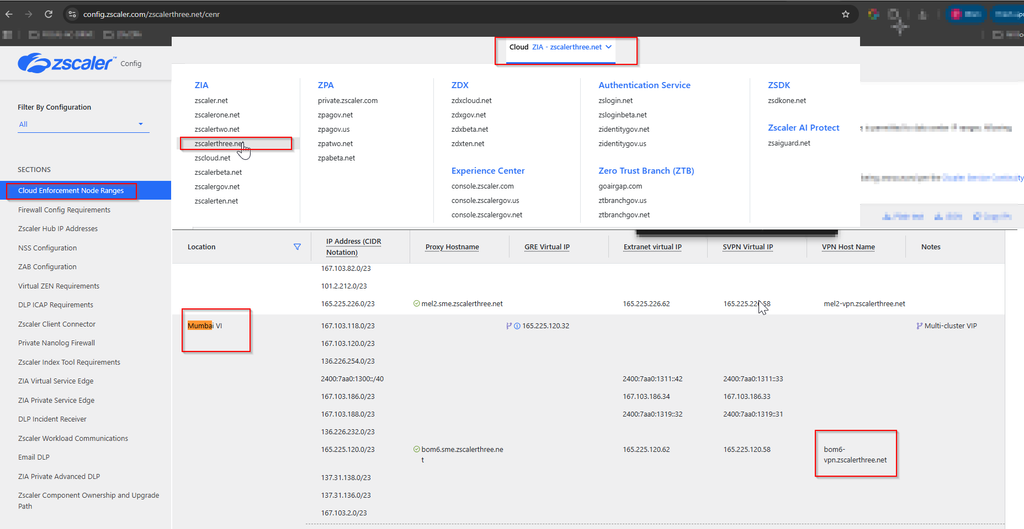
Figure 5 – Zscaler Cloud Enforcement Node Ranges: selecting the nearest VPN Host Name
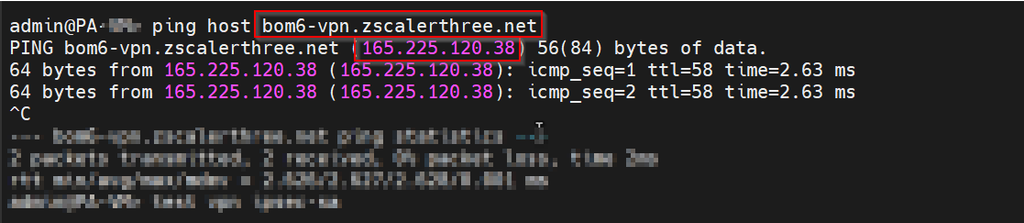
Figure 6 – Palo Alto CLI: resolving the VPN hostname via ping to obtain the Peer IP
C. Configure the IKE Gateway in Palo Alto
Navigate to Network > Network Profiles > IKE Gateways and click Add.
Enter a Name for the gateway (e.g., IPSEC-GRE).
Set the Interface to the appropriate WAN interface (e.g., ethernet1/1).
Set Peer IP Address Type to IP and enter the resolved Peer IP from step B.
Set Authentication to Pre-Shared Key and enter:
Example@224
Set Local Identification to “User FQDN (email address)” and enter the FQDN configured in ZIA.
Under Advanced Options, select IKEv2 preferred mode and apply the default IKE Crypto Profile.
Click OK.
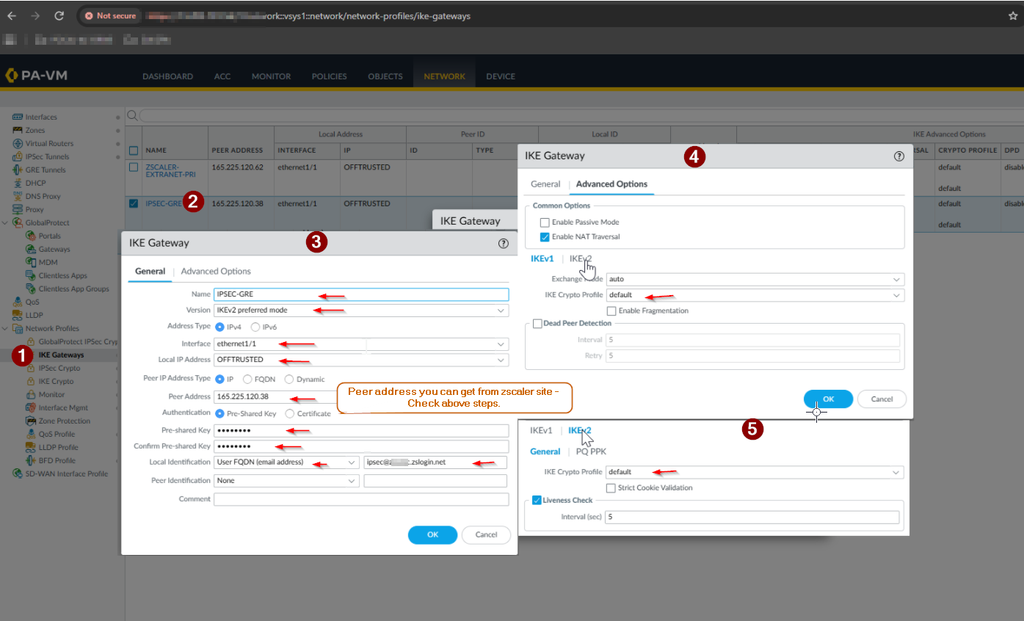
Figure 7 – Palo Alto: IKE Gateway configuration (General and Advanced Options tabs)
D. Create the Tunnel Interface
Navigate to Network > Interfaces > Tunnel and click Add.
Under the Config tab, assign the interface to the appropriate Virtual Router and Security Zone (e.g., IPSEC).
Optionally assign an IP address on the IPv4 tab (e.g., 192.168.1.2/24) for monitoring purposes.
Click OK and commit if required.
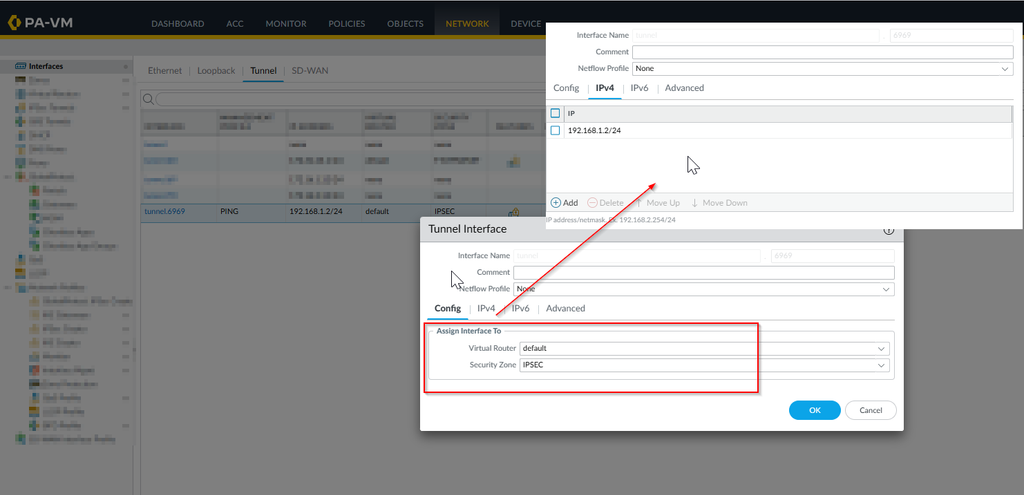
Figure 8 – Palo Alto: Tunnel Interface assigned to Virtual Router ‘default’ and Security Zone ‘IPSEC’
E. Create the IPsec Tunnel
Navigate to Network > IPsec Tunnels and click Add.
Enter a Name (e.g., IPSEC-GRE).
Assign the Tunnel Interface created in step D.
Set the IKE Gateway to the gateway created in step C.
Set the IPsec Crypto Profile to default.
Under the Proxy IDs tab — leave all Proxy IDs blank (Zscaler uses route-based VPN).
Click OK.
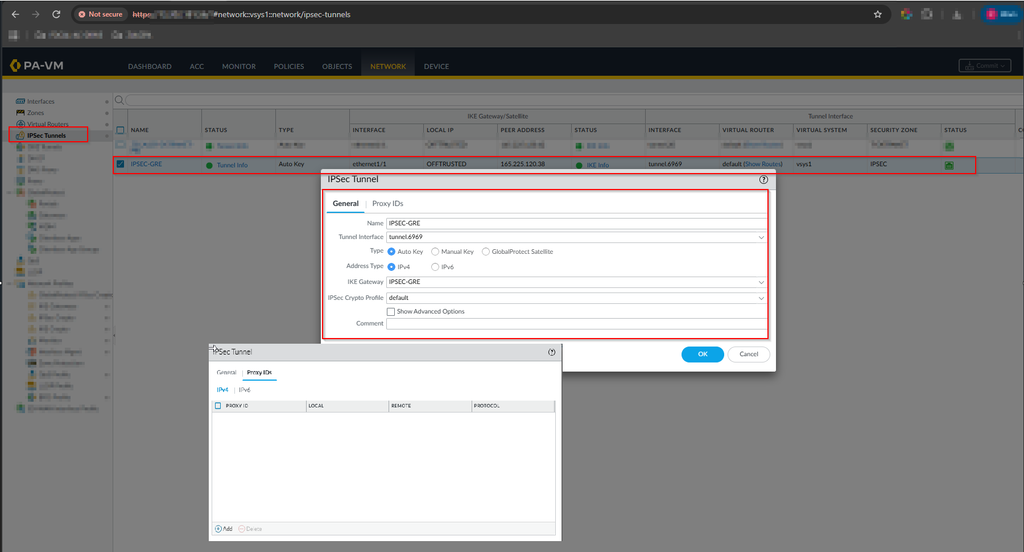
Figure 9 – Palo Alto: IPsec Tunnel configuration (General tab and empty Proxy IDs tab)
F. Create a Security Policy (if required)
If traffic from the untrusted interface to the untrusted zone is not permitted by default, create a security policy to explicitly allow it:
Navigate to Policies > Security and click Add.
Set Source Zone and Destination Zone both to OFFTRUSTED (or as applicable).
Set Action to Allow.
Scope the destination address to the Zscaler Peer IP (e.g., 165.225.120.38/24) for tighter control.
Commit the change.

Figure 10 – Palo Alto: Security policy permitting OFFTRUSTED → OFFTRUSTED traffic to Zscaler peer
G. Verify Tunnel Status
If the IPsec tunnel does not come up automatically, log in to the Palo Alto device via CLI and run the following diagnostic commands:
test vpn ipsec-satest vpn ike-sa<br>
These commands initiate IPsec SA and IKE SA negotiations. If multiple tunnels are configured, refer to the vendor documentation or query an AI assistant for tunnel-specific command syntax.
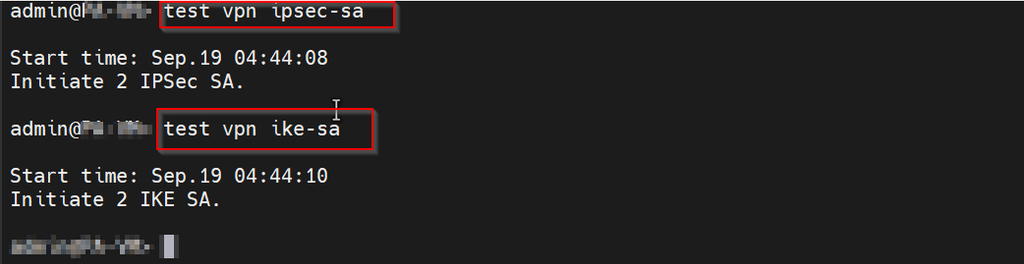
Figure 11 – Palo Alto CLI: running ‘test vpn ipsec-sa’ and ‘test vpn ike-sa’
Section 3: Tunnel is UP — Verification
Once the IPsec tunnel is established, both the Palo Alto firewall and the ZIA portal will show the tunnel as active. The screenshots below confirm a successful connection.
Palo Alto Side
The IPsec Tunnels view in Palo Alto shows the tunnel status as active (green indicator) with Tunnel Info available.

Figure 12 – Palo Alto: IPsec Tunnels list showing IPSEC-GRE tunnel as active (green status)
ZIA Side
In the Zscaler ZIA portal (Data Explorer > Tunnel Insights), IPsec IKEv2 Phase 1 and Phase 2 events are logged, and the Tunnel Status confirms the tunnel is UP.
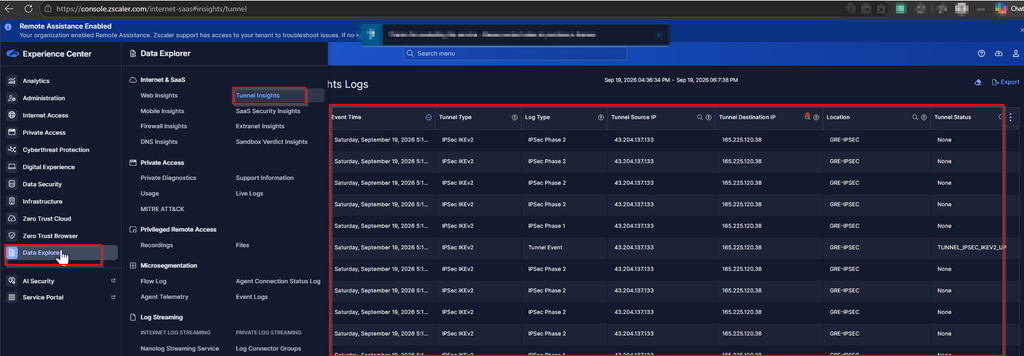
Figure 13 – ZIA Data Explorer: Tunnel Insights showing IPsec IKEv2 Phase 1 & 2 events with TUNNEL_IPSEC_IKEV2_UP status
Moreover, thank you for reading this; I hope it helped you.
💬 Have questions or need support? You can reach me directly at princekumarssm2445@gmail.com
I have extensive hands-on experience with the following technologies:
- 🔵 Zscaler ZIA / ZPA
- 🔥 Palo Alto NGFW & Prisma Access
- 🌐 CloudGenix SD-WAN (Palo Alto)
- 🛡️ Fortinet
- 🔗 Cisco
Thanks man, it really helped.